Thursday, December 23, 2021

Merry Christmas + Homemade Biscuits


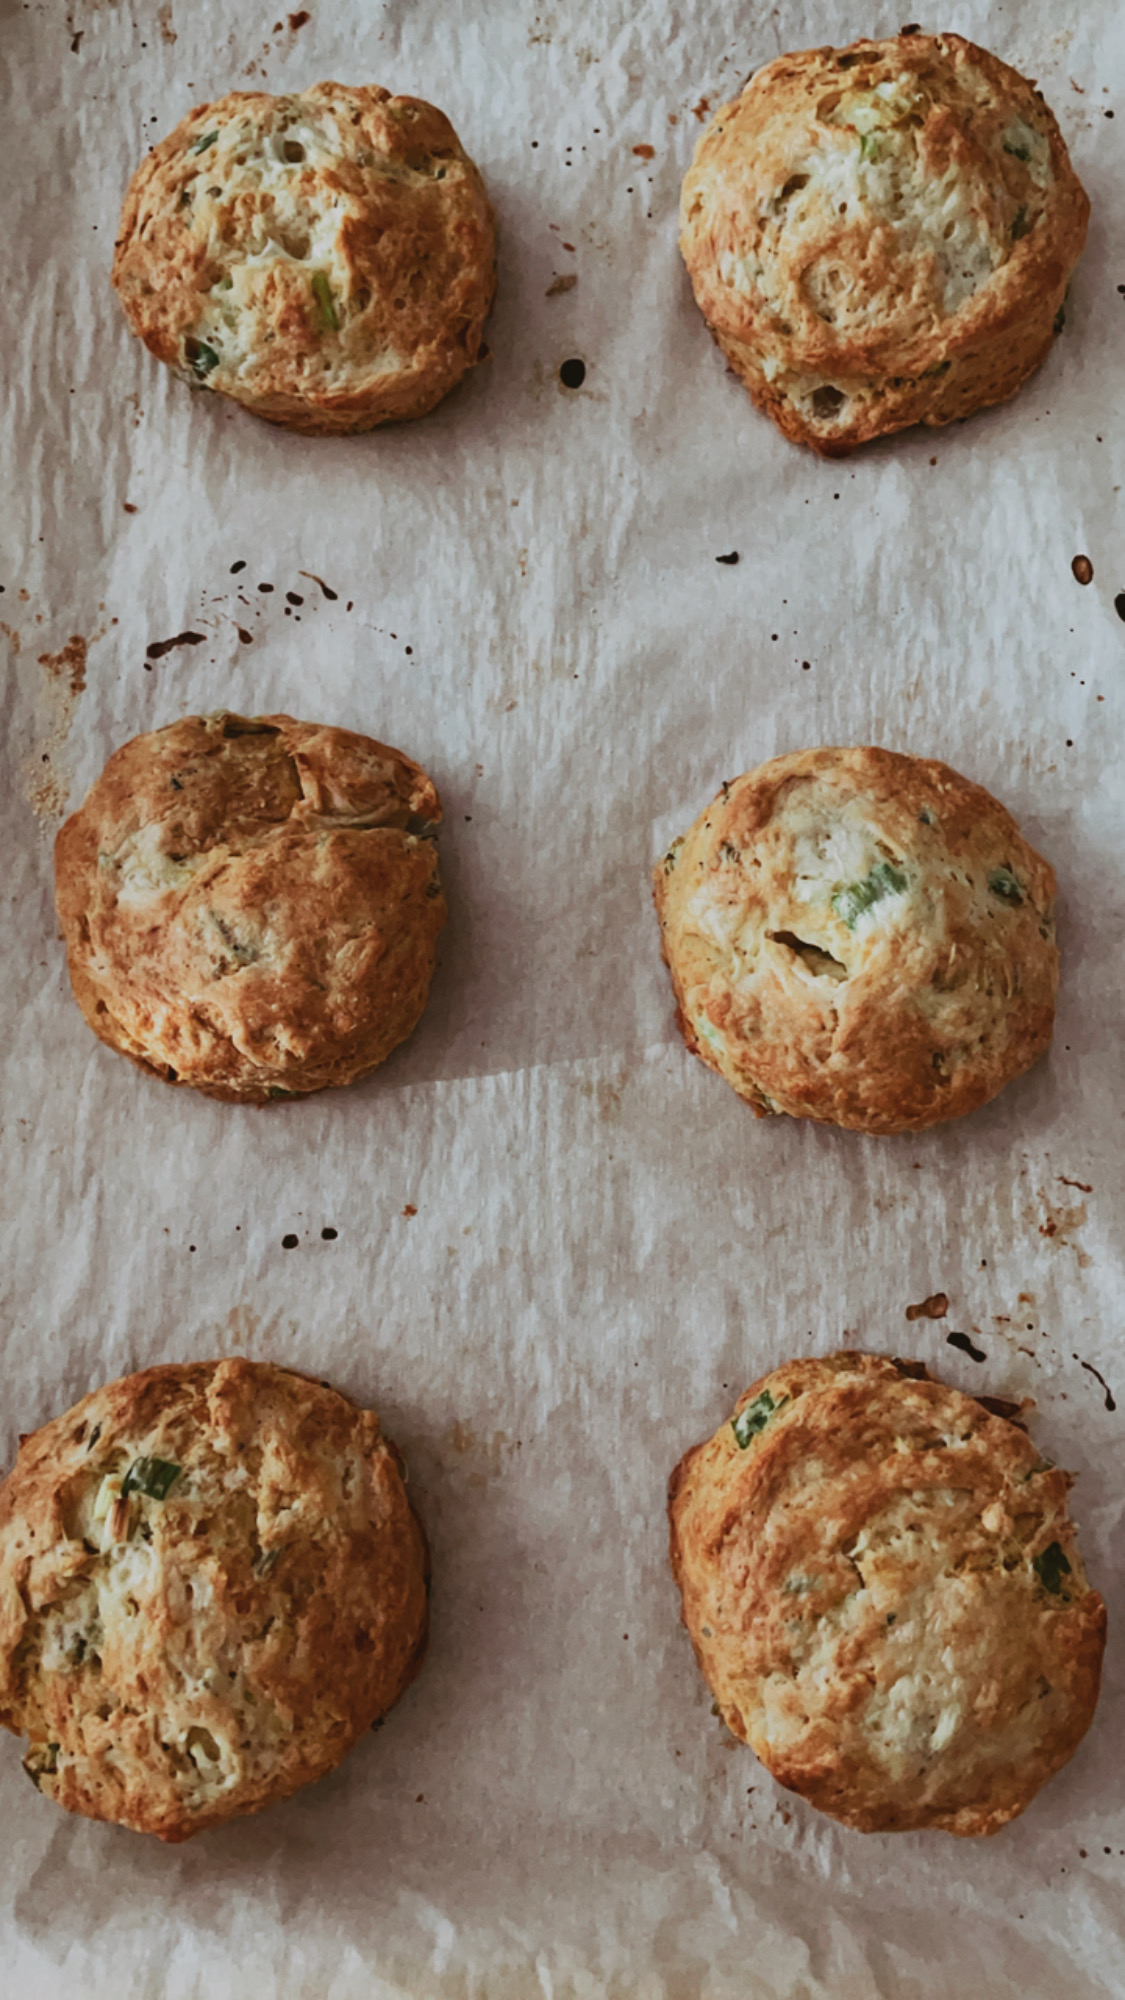
Holidays and baking go hand-in-hand for me, so this past Sunday, I decided to slow down and finally bake homemade biscuits.  Yummy, right?!  

They truly were, with a savory, herbaceous twist, that makes them great for devouring morning, noon or night (i.e. for breakfast, brunch or dinner).  So with that said, I wanted to share the recipe with you in case you decide to follow my lead and bring them to your holiday eating repertoire.  

I'd actually been eyeing these since I saw the recipe in my November issue of Bon Appetite magazine, so it felt good to finally bring them to life in my kitchen. I'm so thrilled to say that they didn't disappoint.  To the contrary, they came out wonderful--with beautiful layers (the hallmark of a great biscuit, no?) and are easy to bring together.
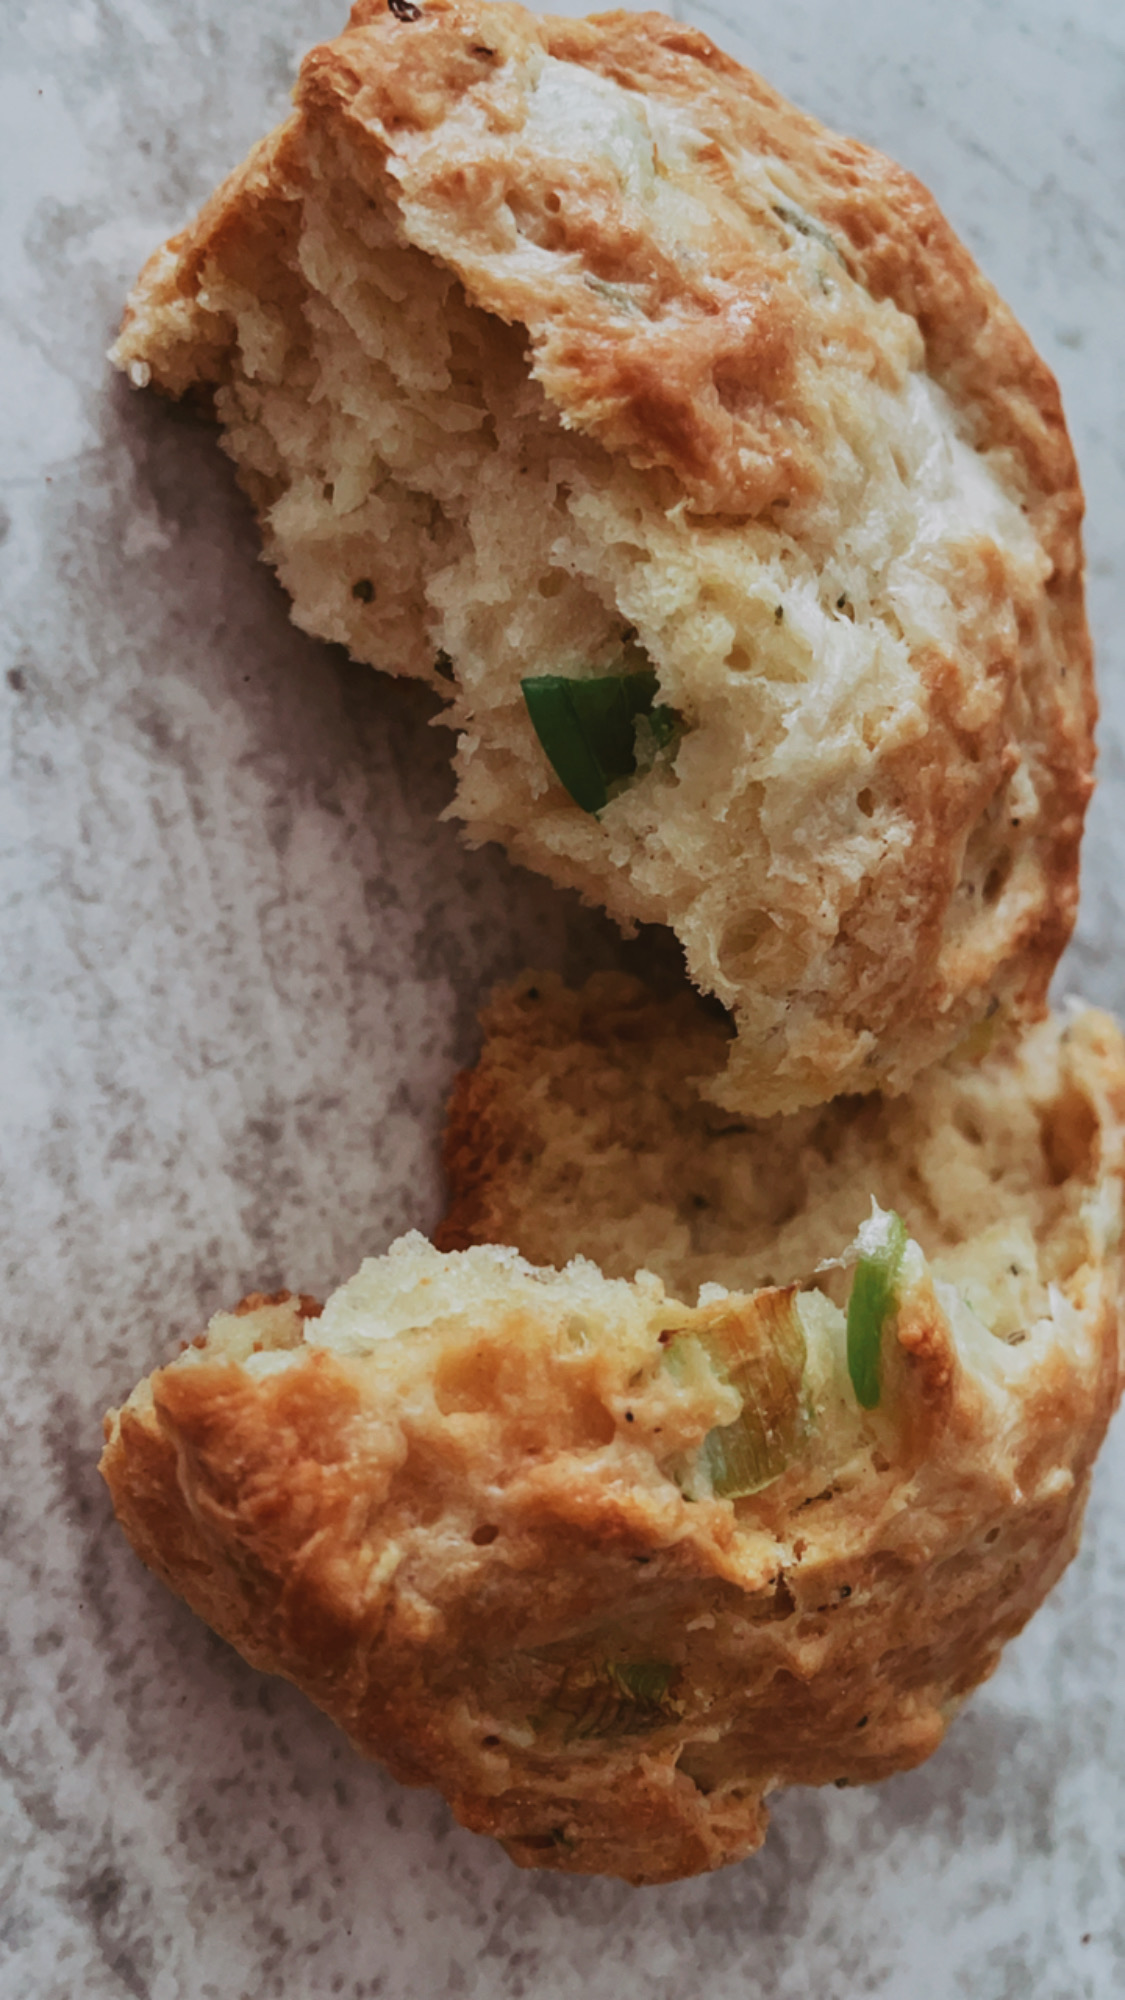


I baked a few to enjoy and photograph for the blog :) and froze the rest of the batch for homemade biscuits on demand, whenever the notion--or craving--hits.  

So whenever you decide to bake them, I hope you experience the same Happy Eating.

Blessings for a Merry Christmas!

xx, Dawn

Stuffing Biscuits 


SHARE:

Wednesday, June 20, 2018

{Be Inspired!}: Summer Reading

A favorite pastime in my local bookstore
Summer and reading have always been a favorite pair for me.  And if I'm being completely honest, it goes all the way back to my childhood. I fondly remember the times when choosing and checking out library books through the mail, no less, brought as much joy and preoccupation as riding my bike and watching my favorite t.v. shows.  It was almost as if I couldn't read the books, mail them back, and order new ones, fast enough. (I'm still in awe at how amazing my county library system was to put books and the love of reading at our fingertips.)

Then there were the suggested (ahem, mandatory) Summer reading lists that would follow in later years.  And I was still sold and fascinated all the same.  I even managed an "advanced for my age" title or two.  Like the Summer I read Alice Walker's, The Color Purple, at the ripe age of 11 and returned to my 6th grade English class in the new school year ready to do a book report on the work.  I don't recall if that went over well with my teacher, but I'll never forget how glad I was to have the full, robust backdrop of the book when the acclaimed movie was later released.

I could go on and on about the many expressions that my love for books, the written word--poetry, prose, history, literature, everything--and reading have taken over the course of my life, but I'll save those for future posts. :)  For now, suffice it to say that I'm eager to get some new titles under my belt as the season unfolds.

I haven't firmed up my selection yet, but with Summer officially arriving this week, I'm motivated to do so sooner than later.  I recently came across this list of 8 Non-Cookbook Food Books curated by Bon Appetit.  A couple of these titles are definitely piquing my interest, so we'll see where I ultimately land.

And what about you?  Do you enjoy a Summer read, or two, or four?  What's your favorite genre? Author(s)?  I'd love to know what's on your list!

No matter your preference, we can all celebrate the gift of books and...

Happy Reading!


SHARE:

Friday, July 28, 2017

{Toast With This!}: Strawberry Spritzer

Enduring the Summer heat is a lot more bearable when you're sipping on a cool, effervescent and refreshing drink that boasts the season's bounty.  And with that in mind, I recently added another favorite to my mocktail repertoire.

Inspired by my love for homemade everything, I set about to create a strawberry puree, accented with a hint of fresh lime juice.  And can I just tell you--it was sooo good.  (Like, spoonfuls in the middle of the day, straight from the container, kind of good. Don't judge me.)  From there, the possibilities became endless for how to make the most of the berry-licious concoction.

Freeze into sorbet.  Spoon over ice cream.  Make into a seasonal spritzer.  The latter of these was my immediate go-to, but the other options are still very much alive.

And this "non-recipe", recipe of sorts, couldn't be easier to pull off--or transform with additional or alternate flavors.  One technique x endless options = happy cooking at its finest.

So cheers to more of Summer's luscious flavors...and to Happy Sipping!

Strawberry Spritzer
Ingredients:
1 lb. fresh strawberries, hulled and halved
Juice of 1/2 lime, plus more to garnish as desired
1/2 cup sugar
Club soda
Ice Cubes

Method:
Place strawberries in a blender or food processor and blend into a puree.  Strain puree through a fine mesh sieve.

Add in sugar and lime juice and stir well to combine.  Store in an airtight container for 8-12 hours or overnight to chill mixture.

Mix together 1/4 cup of puree and 3/4 cup of club soda.  Pour over ice, serve and enjoy!

Recipe adapted from Bon Appetit 


SHARE:

Friday, March 31, 2017

Cherry Upside-Down Cake

There will always be certain foods and tastes that whisk me right back to my childhood.  And upside-down cake--of the pineapple variety--is one.  While it was never a staple in my family's baking repertoire, I was always delighted when I happened upon a well executed (or otherwise) taste of this unconventional cake.  Unconventional in my childhood meant sans frosting.  And with cooked fruit.  The only cake in my confectionery world that hit those marks back then was my mom's Christmas Fruit Cake (and, shhh... I was never really a fan.)  Still, the sweet and caramelized pineapple atop decadent, sponge-like cake worked for me.

Fast forward a "few" years, and I happened upon a recent cherry rendition via Bon Appetit.  A one bowl wonder, and the memories of upside-down cake indulgence of days gone by, fueled my resolve to bake. this. cake.  And I'm so glad I did.

A leisure Sunday afternoon provided the perfect backdrop for abandoning myself to the tasks of prepping, baking, "unmolding" (fingers were crossed!), and finally tasting this gem of a dessert.  The sweet, dark cherries, accented with hints of citrus, and the buttery, melt-in-your-mouth cake made for a great pairing--and not too few cake, coffee, cake, tea, cake rotations in the days since.

Frozen cherries worked fine, so there's virtually no hassle in assembling your ingredients and getting down to baking business.  Add it to your baking agenda--and your memories will soon thank you, also.

Happy Eating!

Cherry Upside-Down Cake
  

SHARE:

Thursday, August 11, 2016

Roasted Red Peppers and Cherry Tomatoes with Goat Cheese

Tomato season is finally here--and if that excites you as much as it does me, then you'll be happy to add a simple, but superbly fresh and delicious recipe to your Summer eats rotation.  Vibrant, roasted red peppers provide the perfect canvas for ripe cherry tomatoes, sweet basil, tangy goat cheese and other savory flavorings.

The tastes of Summer are on full display in this simple, yet scrumptious, salad.

Happy Eating!

Roasted Red Peppers and Cherry Tomatoes with Goat Cheese
(Recipe adapted from Bon Appetit)
 
Ingredients:
  • 4 red bell peppers, halved, seeds and ribs removed
  • 6 oil-packed anchovy fillets, finely chopped
  • 4 garlic cloves, thinly sliced
  • 1 cup basil leaves, divided
  • Kosher salt, freshly ground pepper
  • 2 tablespoons plus ⅓ cup olive oil
  • 1 pint cherry tomatoes, halved
Method:
  • Preheat oven to 375°. Place bell peppers, skin side down, in a shallow baking dish and top with anchovies and garlic. Tear ¼ cup basil leaves over top, season with kosher salt and black pepper, and drizzle with 2 Tbsp. oil. Bake until peppers are tender but still hold their shape and are slightly charred around edges, 35–45 minutes. Let cool.

  • Meanwhile, blend remaining ¾ cup basil and remaining ⅓ cup oil in a blender until smooth; season basil oil with kosher salt and black pepper. 

  • Arrange bell peppers on a platter. Top with tomatoes, goat cheese, and more basil, then drizzle with basil oil and season with sea salt and black pepper.


SHARE:

Friday, January 15, 2016

{Put an Egg on It}: Recipes, Cooking Techniques & More!

Herbed Baked Eggs
Welcome to the wonderful world of eggs!  Boiled. Baked. Scrambled. Poached. Frittatas. Omelets. (Okay, by now you get the picture.)  The incredible, edible egg is indeed one versatile and mouth-watering star ingredient fueling some of our most delicious dreams. 

I, for one, have taken to incorporating them into my diet more since the new year debuted (the boiled variety is a favorite for protein-fueled breakfasts and snacking).  But did you ever consider that when it comes to preparing them, technique is involved?  Well, there is.  And today's post is dedicated to all the egg-noshing, technique, and etiquette savvy, that I can muster.  If you're like me, you'll soon be saying, 'put an egg on it!'. 

Recipes ~

Herbed Baked Eggs are one of my absolute favorite ways to indulge.  Easy, yet elegant, they're even great for entertaining (think brunch).  For more ways to indulge, here are 44 (yes, 44) additional recipes to keep your egg recipe rotation in high gear.

Technique ~ 

What every good cook needs, but admittedly sometimes lacks, is the skill to pull off the runny, poached egg, light and fluffy omelet, and immaculate golden yolk that boiled eggs are made of.  If that's someone you know ;), then help is here.  These tips and tricks will have your egg game strong before you can say, 'what's for breakfast?'.

Etiquette ~ 

And once all the "work" is done, all that's left is the eating, right?  Well, before you do, make sure you know exactly how to eat them.  My quick and fun dining tutorial will equip you in no time.

Now... on to Happy Eating!


SHARE:

Monday, November 2, 2015

All About Pie: Primers, Tips & Tricks

Photo Credit: Williams-Sonoma

When it comes to baking, pies are in a class all their own.  From mastering the perfect dough, to blind baking, to avoiding common mistakes, to yielding (and decorating) the best crust ever, I've gathered the essentials to ensure your pie-baking expeditions are better and more scurmptious than ever.

William-Sonoma's Pie Primer serves up everything you need to know to master a perfect dough and yield a beautifully delicious pie--again and again.

Bon Appetit reveals the six common pie-baking mistakes--and how to avoid them.

Martha Stewart rounds things out with a Pie Crust 101 tutorial for fail-proof results.

With these pie essentials in tow, you'll be all set to indulge in...Happy Baking!
SHARE:

Thursday, April 2, 2015

Raspberry-Ricotta Cake


The trifecta of berries, baking and dessert seems to have made its way into my kitchen chronicles again recently.  I know I've been sharing a bit along these lines lately, but can you blame me?  Well, if I told you that this latest confection came together in just over an hour (baking time included), you would surely understand why I just had to share.

I discovered the recipe in my March issue of Bon Appetit and knew I would be baking it soon.  And why not?  It's quick, easy (you don't even need a mixer), and delivers up a moist, sweet, berrylicious bite that's ideal for a last minute dessert--or, as in my case, a just because treat.


  Springtime, berries, cake and the joy of baking.  What could be better?

Happy Eating! 

Raspberry-Ricotta Cake
Recipe courtesy of Bon Appetit

Ingredients:
Nonstick vegetable oil spray
1 1/2 cups all-purpose flour
1 cup sugar
2 tsp. baking powder
3/4 tsp. kosher salt
3 large eggs
1 1/2 cups ricotta
1/2 tsp. vanilla extract
1/2 cup (1 stick) unsalted butter, melted
1 cup frozen raspberries (or blackberries), divided

Method:
Preheat oven to 350 F.  Line a 9"-diameter cake pan with parchment paper and lightly coat with nonstick spray.  Whisk flour, sugar, baking powder and salt in a large bowl.

Whisk eggs, ricotta and vanilla in a medium bowl until smooth; fold into dry ingredients just until blended.  Then fold in butter, followed by 3/4 cup of raspberries, taking care not to crush berries.  Scrape batter into prepared pan and scatter remaining 1/4 cup raspberries over top.

Bake cake until golden brown and a tester inserted into the center comes out clean, 50-60 minutes.  Let cool at least 20 minutes before unmolding.

Do Ahead: Cake can be made 2 days ahead.  Store tightly wrapped at room temperature.   
SHARE:

Wednesday, June 18, 2014

{Homemade}: Dutch Baby Pancake with Blueberry Compote

I was already thinking of whipping up homemade pancakes as a part of my weekend wind-down, when I stumbled upon a recipe for a homemade dutch baby pancake from Bon Appetit, replete with a homemade fruit compote to take it over the top.  Because it had been years since I'd made my first dutch baby, I was sold and couldn't wait to wake up my kitchen with this scrumptious first bite of the day. 

Moments later, a quick scan of my kitchen pantry and fridge revealed that I had the necessary goods to get this recipe off the ground--but with no cherries and peaches for the compote (as featured on Bon Appetit).   What, then, could I do to still make it work without leaving the compote behind?  I employed my philosophy that cooking is often equal parts inspiration and improvisation--and I improvised!  Instead of a cherry compote, I would take the luscious blueberries I had sitting pretty and make the compote all the same.  (I love it when a plan comes together!)

So without any further ado, I gathered my ingredients and made myself one grand breakfast.  In truth, I didn't allow myself to eat the entire thing since I knew there might be some waistline repercussions, but I savored enough to leave me satiated--and thankful for a little improv.  It was the perfect weekend indulgence, and I hope you'll bring it into your kitchen with the same abandon--and enjoy!

Happy Eating!

Get the recipe here (and substitute fresh or frozen blueberries for the cherries).

SHARE:

Monday, October 7, 2013

{Homemade}: Gnocchi with Balsamic Brown Butter


I was away from my home kitchen for most of last week, so once the weekend rolled around, I was more than ready to get back to it and take in a good home-cooked meal.  I'd been eyeing a recipe for easy, homemade gnocchi -- that diverged from the traditional potato gnocchi -- and decided to give it a try.  And now that the results are in, I'm glad I did.

I enjoy making homemade pasta, however I had never gotten around to making gnocchi.  So with a full week behind me, and an equally full week ahead of me, I loved the possibility of bringing together a dish that screams "rock star" without any of the fuss you'd expect.

The ingredient list for the pasta recipe read like a dream: ricotta, egg, flour, salt.  That simple.  Now if the results turned out to be solid (aka edible -:) ), I was certain that this would become a go-to staple in my repertoire.   

A quick turn later after making the dough, I begin to pipe it out into hot, boiling, salted water and within minutes, homemade gnocchi was mine for the feasting.  In keeping with my fuss-free, yet delicious, theme, I decided to pair the creamy, pillowy drops with a favorite balsamic brown butter.  I rounded out the dish with toasted walnuts and freshly grated parmigiano for a bit of added crunch and flavor.  

Pleased with the results, I couldn't wait to file this one away for future noshing.  But...not without sharing it with you first.

Happy Eating!

Gnocchi 
by Chef Nemo Bolin of Cook and Brown Public House

Ingredients:
2 cups ricotta
1 large egg
Pinch salt, plus more for seasoning
1/2 cup flour

Method:
Combine ricotta, egg, and a pinch of salt in a food processor. Process until creamy and smooth. Add flour and pulse just enough to incorporate. Transfer dough to a pastry bag or resealable plastic bag. Cut off the tip of the bag leaving a 1/2-inch-wide hole. Working in batches, pipe gnocchi directly into boiling salted water, using a paring knife to cut off segments of dough (see image). 


Cook until nearly doubled in size, 2-3 minutes. Using a slotted spoon, transfer to a parchment-lined baking sheet. Use right away or freeze on baking sheet until hard and transfer to a resealable plastic freezer bag. (No need to thaw them before using; they’ll reheat in whatever sauce you pair them with.)
 
Balsamic Brown Butter
Recipe courtesy of Giada De Laurentiis

Ingredients:
6 tablespoons unsalted butter
2 tablespoons balsamic vinegar
1/2 teaspoon salt
1/4 teaspoon freshly ground black pepper

Method:
In a medium saucepan cook the butter over medium heat, stirring occasionally. When the foam subsides, and the butter begins to turn a golden brown, about 3 minutes, turn off the heat. Let cool for about 1 minute. Stir in the balsamic vinegar, salt, and pepper.

Combine the gnocchi and balsamic brown butter.  Sprinkle with toasted walnuts, top with freshly grated parmigiano, and enjoy!


SHARE:

Thursday, September 12, 2013

Toast with Lemony Pea Mash


I love it when one good thing leads to another.  You may recall my excitement over preserving lemons a while back (one scrumptiously good thing).  The next step in my preserving adventures has been to find ways to indulge in these delicacies.  And as it often happens, while reading through an issue of Bon Appetit magazine, I discovered the recipe for Toast with Lemony Pea Mash, which calls for, among other things, preserved lemons (another good thing).

So now, I'm happily on the way to discovering and devouring recipes that will bring this star ingredient into my cooking and noshing.  And I couldn't think of a better (or more satisfying taste) to lead the way than warm toast slathered with a sweet, lemony, herbaceous and garlicky "mash". 

As a quick bite, hors d'ouevres, late nite snack, or whatever, take the time to relish this simple recipe whose flavors are anything but.

Happy Eating!

Toast with Lemony Pea Mash

Ingredients:  
1 garlic clove, quartered 
1/4 cup fresh flat-leaf parsley leaves 
3 tablespoons extra-virgin olive oil, divided, plus more for toast
Kosher salt 
2 cups shelled fresh peas (from about 2 pounds pods) or frozen peas, thawed 
2 tablespoons chopped fresh chives 
1 tablespoon finely chopped preserved lemon peel (from 1/2 preserved lemon), divided 
1 tablespoon (or more) fresh lemon juice 
1/2 teaspoon crushed red pepper flakes plus more for serving 
Freshly ground black pepper
Slices of ciabatta or other rustic bread, toasted


Method: 
Combine garlic, parsley, 1 tablespoon oil, a pinch of salt, and 1/2 cup water in a small saucepan. Add peas and cook over medium heat, stirring occasionally, until peas are tender, about 5 minutes for fresh peas, about 2 minutes for frozen. Drain, reserving cooking liquid.
Transfer pea mixture to a food processor; pulse until a coarse paste forms. Transfer to a medium bowl; mix in chives, 1/2 tablespoon preserved lemon peel, 1 tablespoon lemon juice, 1/2 tsp. red pepper flakes, and 2 tablespoons oil. Stir in reserved cooking liquid by tablespoonfuls until mixture is still thick but spreadable. Season pea mash with salt, black pepper, and more lemon juice, if desired.
Drizzle toast with oil; top with pea mash, sprinkle with remaining 1/2 tablespoon preserved lemon peel and more red pepper flakes, and drizzle with more oil.
DO AHEAD: Pea mash can be made 1 day ahead. Cover and chill. 
Recipe courtesy of Bon Appetit

 
SHARE:

Wednesday, April 17, 2013

Brussels Sprouts and Steak Stir-Fry

Brussels Sprouts and Steak Stir-Fry
It had been a long time since I made a stir-fry at home, but all that changed recently when I discovered a recipe that combined flavors that I was sure would please.  Flavors like scallions and ginger and soy and rice vinegar and chiles and garlic, along with a couple a of delicious vegetables and steak, that combined to create Brussels Sprouts and Steak Stir-Fry.

With the recipe earmarked in my Bon Appetit magazine and ample motivation in place, I was excited to pull out my beautiful wok (which was overdue for some action) and bring this meal to life.  I took the time to mise en place (i.e. prep) all my ingredients before starting to cook, so everything flowed pretty effortlessly from there. (Always a good idea.)  When the stir-fry was done, I served it over a bed of steamed, brown rice to round out the dish.

I love the ease and casual flair of stir-frys, allowing you to make good use of your imagination, tastes and whatever you happen to have on hand.  Whether you're going all-veggie or tossing in a favorite protein like shrimp, chicken, steak, etc., it's an exciting way to make good (and what I consider fun) food. 

And not to worry, if you don't have a wok handy, you can make this recipe just as easily using a large skillet.  

Happy Eating!


Brussels Sprouts and Steak Stir-Fry

Ingredients:
3 tablespoons oyster sauce 
3 tablespoons reduced-sodium soy sauce  
2 tablespoons unseasoned rice vinegar  
4 tablespoons vegetable oil, divided 
1 pound brussels sprouts, halved  
8 ounces flank or skirt steak, thinly sliced against the grain  
Kosher salt 
4 scallions, whites chopped, greens sliced  
3 garlic cloves, sliced  
2 tablespoons chopped, peeled ginger 
2 medium carrots, peeled, thinly sliced on a diagonal  
1 Fresno chile or jalapeño, sliced into rings  
Steamed rice (for serving)

Method:
Whisk oyster sauce, soy sauce, vinegar, and 1/4 cup water in a small bowl; set sauce aside. 

Heat 2 tablespoons oil in a large skillet over medium-high heat. Add brussels sprouts and cook, tossing occasionally, until golden brown, about 4 minutes. Cover and cook until crisp-tender, about 3 minutes longer. Transfer to a plate; wipe out skillet. 

Season steak with salt. Heat 1 tablespoon oil in same skillet over high heat until just beginning to smoke. Add steak in a single layer; cook until browned, about 3 minutes. Turn and cook until nearly cooked through, about 30 seconds. Add to brussels sprouts. 

Heat remaining 1 tablespoon oil in same skillet. Add scallion whites, garlic, and ginger and stir until fragrant, about 1 minute, adjusting heat as needed. Add carrots and chile and cook, tossing occasionally, until carrots are slightly softened, about 2 minutes. 

Return brussels sprouts and steak to skillet and add reserved sauce. Cook, tossing occasionally, until sauce is thickened, about 3 minutes. Serve with steamed rice and garnish with scallion greens. 

Recipe Courtesy of Bon Appetit

 
SHARE:

Saturday, February 23, 2013

And the Oscar Goes To...

Who doesn't love an occasion (big or small) to celebrate and nosh on delectable bites?  With the Oscars airing this weekend, many are taking their cues for yet another occasion to entertain and bring some fun into the kitchen. 

If you're planning your own fete, check out these "Oscar worthy" offerings that can add a delicious flair to your affair!

1. Smoked salmon dip, mini lobster rolls, and a whole lot of other goodness, are included in this list of 10 easy appetizers (Bon Appetit)

2. Toast to your favorite nominees with this fun mocktail (Martha Stewart)

3.  Enjoy a scrumptious dessert for a sweet finish (Epicurious)

Happy Eating!

*Photo Credit


SHARE:

Tuesday, November 27, 2012

Cranberry Hand Pies

Thanksgiving Day (in all its glory) has come and gone.  And while the holiday has passed, there are certain flavors that are too scrumptious to limit to a special occasion--and deserve to linger.  The cranberry hand pies recipe from my November issue of Bon Appetit is one such recipe.  I knew I had to make them as soon as I saw them, and my instincts did not steer me wrong.

I decided to make these decadent, scrumptious pies as my dessert offering to my family Thanksgiving table.  And the perfectly sweet-tart cranberry-orange filling encased in the buttery, tender pie dough was everything I had hoped (and drooled for).  Umm-ummm goodness that equaled a hit with the family and a keeper for my dessert repertoire.  

Not a perfect presentation, but perfectly delicious
 
I'm especially excited to share this recipe here on D.M.R. Fine Foods after receiving requests for it from our readers and Facebook fans.   I hope you enjoy it as much as I did; it will surely grant you at least one more reason to be thankful. :)

Get the recipe here!  
(Cook's Note: Keep the dough chilled until ready to roll out and cut.)

Happy Eating!


Dough

  • 3 2/3 cups unbleached all-purpose flour
  • 1 cup sugar
  • 1 1/2 tablespoons kosher salt
  • 1 1/2 cups (3 sticks) plus 3 tablespoon unsalted butter, cut into 1/2-inch cubes, frozen


Read More http://www.bonappetit.com/recipes/2012/11/cranberry-hand-pies#ixzz2DOA0YlyI

Dough

  • 3 2/3 cups unbleached all-purpose flour
  • 1 cup sugar
  • 1 1/2 tablespoons kosher salt
  • 1 1/2 cups (3 sticks) plus 3 tablespoon unsalted butter, cut into 1/2-inch cubes, frozen

Filling and assembly

  • 1 pound fresh (or frozen, thawed) cranberries (about 4 cups)
  • 1 1/2 cups sugar
  • 1 teaspoon finely grated orange zest
  • 2 tablespoon fresh orange juice
  • 1/2 teaspoon instant tapioca (not starch)
  • 1/2 vanilla bean, split lengthwise
  • 1 large egg, beaten to blend
  • Raw sugar

Special Equipment

  • A 3-inch-diameter cookie cutter or biscuit cutter


Read More http://www.bonappetit.com/recipes/2012/11/cranberry-hand-pies#ixzz2DO9ee3ZK

Dough

  • 3 2/3 cups unbleached all-purpose flour
  • 1 cup sugar
  • 1 1/2 tablespoons kosher salt
  • 1 1/2 cups (3 sticks) plus 3 tablespoon unsalted butter, cut into 1/2-inch cubes, frozen

Filling and assembly

  • 1 pound fresh (or frozen, thawed) cranberries (about 4 cups)
  • 1 1/2 cups sugar
  • 1 teaspoon finely grated orange zest
  • 2 tablespoon fresh orange juice
  • 1/2 teaspoon instant tapioca (not starch)
  • 1/2 vanilla bean, split lengthwise
  • 1 large egg, beaten to blend
  • Raw sugar

Special Equipment

  • A 3-inch-diameter cookie cutter or biscuit cutter


Read More http://www.bonappetit.com/recipes/2012/11/cranberry-hand-pies#ixzz2DO9ee3ZK


SHARE:

Thursday, August 23, 2012

On the Table: Chicken with Herb-Roasted Tomatoes and Pan Sauce

While the days of Summer are starting to dwindle, the tastes of Summer are still very much alive.  And that especially holds true for fresh, vibrant tomatoes.  Enjoying this fruit in-season makes for delicious noshing, whether they're the star of a soup, salad, main course or served on their own, luscious lonesome--the way I most enjoyed eating the tomatoes from my grandparent's garden as a little girl.

And with this recipe for Chicken with Herb-Roasted Tomatoes and Pan Sauce from Bon Appetit, they become the star ingredient in a simple, but satisfying, dish that's perfect for both a quick weeknight meal and a leisurely weekend dinner.

The tastes of Summer were meant to be savored and this fresh and healthy dish gives you lots to love.

Happy Eating!


P.S. What tastes of Summer do you enjoy most?


Chicken with Herb-Roasted Tomatoes and Pan Sauce

Ingredients: 
1 1/2 pounds cherry tomatoes or other small tomatoes on the vine
6 tablespoons olive oil, divided  
2 tablespoons herbes de Provence  
1 teaspoon kosher salt plus more  
Freshly ground black pepper  
1 tablespoon Worcestershire sauce  
1 pound skinless, boneless chicken breasts
1 small shallot, minced  
2 tablespoons red wine vinegar  
3 tablespoons flat-leaf parsley leaves

Method: 
Preheat oven to 450° F. Combine tomatoes, 2 Tbsp. oil, and herbes de Provence in a large bowl. Season with salt and pepper; toss to coat. Heat 1 Tbsp. oil in a large heavy ovenproof skillet until oil shimmers. Carefully add tomatoes to pan (oil may spatter). Transfer skillet to oven and roast, turning once, until tomatoes burst and give up some of their juices, about 15 minutes. Transfer to a medium bowl and drizzle with Worcestershire sauce.  
Meanwhile, season chicken all over with 1 tsp. salt and pepper. Heat 2 Tbsp. oil in a large ovenproof skillet over medium-high heat. Sear chicken on both sides until golden brown, 6–8 minutes. Transfer pan to oven and roast chicken until cooked through, 8–10 minutes. Transfer chicken to a cutting board and let rest for at least 5 minutes. 
Add remaining 1 Tbsp. oil to same skillet; heat over medium heat. Add shallot and cook, stirring often, until fragrant, about 1 minute. Deglaze pan with vinegar, scraping up browned bits from bottom of pan; add tomatoes and their juices and simmer until sauce is just beginning to thicken, about 1 minute. Season sauce to taste with salt and pepper. 
Slice chicken; divide among plates. Spoon tomatoes and sauce over; garnish with herbs.  Enjoy!
Recipe Courtesy of Bon Appetit
 
SHARE:

Friday, August 10, 2012

Link Love: Weekending

Photo Credit: Bon Appetit
It's the weekend!  There are few phrases that get as much acclaim and evoke more genuine excitement than this one does.  And beyond the obvious reasons of more time for ourselves, our families--our worlds (and things we love)--it's also the perfect excuse opportunity for food, fun and a bit 'o entertaining.  

This weekend will be an especially prime opportunity for said pleasures as we prepare to bid farewell to the Summer Olympics for another four years.  I'm sharing a few links from around the web to make your weekend something special whether you opt to go it alone or enjoy with others.

So here's to the weekend...and, as always, to Happy Eating!

Have fun with dessert and throw a BYOP (Bring Your Own Pie) Social! (bonappetit.com) 

Wind down (or up!) with some great tunes.  Create your own mix or sample Tory Burch's Summer Getaway Playlist for variety. (ToryBurch.com)

Sleep in--and afterwards enjoy a decadent brunch. (MarthaStewart.com)

Make a date for afternoon tea at a local hotel or tea parlor!


SHARE:

Tuesday, May 29, 2012

Flavor Full: Creole-Spiced Shrimp

My love affair with bold flavors is no secret.  And when I spot a recipe like creole-spiced shrimp, I'm all over it.  In about the time it takes to preheat your oven, the ingredients come together to form the perfect pouch of flavor-full goodness, which made this the perfect quick and easy dinner on a recent weeknight.

My version was adapted from the original recipe from Bon Appetit, to accommodate the ingredients I had on hand, without missing any of the creole-spicy oomph that initially drew me to the recipe.  The shrimp are married with the flavors of Old Bay, Tabasco, Worcestershire sauce, shallots, bay leaves, lemon, salt and pepper, and finished with a little butter and water to form the most decadent bath and steaming juices for the shrimp.  (If you're a little gun-shy about the spiciness, not to fret; you can temper the ingredients to your personal spice comfort zone.)

Within a half hour, the foil pouch emerges from the oven to reveal shrimp that are cooked and seasoned to savory perfection, with lots of jus for added deliciousness.

Take it from this self-avowed 'Spice Girl', you want this recipe in your repertoire.

Now...onto Happy Eating!

Creole-Spiced Shrimp

Ingredients:
Shrimp, peeled and deveined
Shallot, sliced
Lemon, thinly sliced
Bay leaves
Worcestershire sauce
Tabasco
Old Bay seasoning
Kosher salt
Freshly ground black pepper
Butter

Method:
Preheat oven to 325 F.
 
Add shrimp and ingredients (except butter), to taste, to a bowlToss to combine.  

Place shrimp mixture inside a 16x12 in. square of heavy duty foil. (Recommended: 1/2 lb. shrimp per square of foil.)  Fold the edges of the foil toward the center, but don't seal. Top mixture with a pat of butter and two to three tablespoons of water.  Crimp edges tightly into a sealed pouch.

Place pouch(es) on a baking sheet and place in preheated oven.  Bake for about 30 minutes or until shrimp are thoroughly cooked.  Remove from oven and carefully open pouch to allow steam to escape, being careful not to allow the juices to escape.  Pour shrimp and jus into a serving dish and enjoy!   
Recipe adapted from Bon Appetit 

SHARE:
© D.M.R. Fine Foods. All rights reserved.
MINIMAL BLOGGER TEMPLATES BY pipdig